Backgammon Help  

[Help Contents]

[Game Help Contents]

Description

Backgammon is the classic "race" board game, where you and your opponent both try to get all of your pieces home before the other does. Along the way, you can get in your opponent's way and even set him/her back a bit! These instructions cover the basic rules of Backgammon (which apply to many variations, including Nackgammon, HyperGammon, and LongGammon, which are exactly like standard Backgammon except that the initial board setup is different), as well as describing the normal rules of match play (as used for the site's Backgammon Match 5, Backgammon Match 9, and Backgammon Match 21 games and also the BG Match 5 - No Cube, BG Match 9 - No Cube, and BG Match 21 - No Cube games).

Instructions

Objective

To get all of your pieces home before your opponent does.

Quick Summary for Experienced Players

  • When the dice are rolled, one will be highlighted. Click a piece to move it using the highlighted die. If you want to move the other die first, click that die to highlight it, then click the piece to move.
  • When you're blocked and have to pass your turn, you have the option to have Pocket-Monkey(tm) automatically continue passing your turn until you can move again (it's an option on the confirmation window that comes up).
  • Notes on match play:
    Backgammon Match 5, Backgammon Match 9, and Backgammon Match 21:
    • Click the Roll button (or one of your dice) to roll the dice; alternately, click the Offer Double button (or the doubling cube) to offer a double.
    • When you're being offered a double, Accept and Decline buttons appear -- click the appropriate button.
    • In matches, turning on auto-passing when you're blocked implies you want to roll the dice (rather than offer a double) until you're not blocked any more.
    • Pocket-Monkey(tm) matches use the Crawford Rule.
    BG Match 5 - No Cube, BG Match 9 - No Cube, and BG Match 21 - No Cube:
    • The doubling cube, which was invented in the 1920's, is not used, so these are the older "pure" matches that don't involve doubling.
    • Since doubling is not involved, the dice are rolled automatically as with single games, and of course the Crawford rule is irrelevant.
    All of the match games:
    • You may resign a game without resigning a match using the Resign button. By default, Resign just resigns one game; there's an option to resign the entire match if you like.
    • When resigning games, beware of accidentally resigning gammons or backgammons! The confirmation window will tell you what you're resigning.

Rules

  • Layout
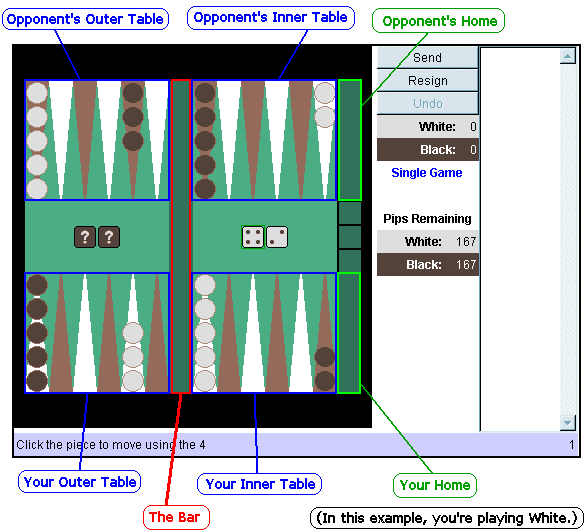
    The game is played on a board with four playing areas, called tables, arranged in a square. Each table has six points on which you can place pieces (these are called "points" because, well, they're pointy -- see the diagram below). When the game begins, your pieces are typically arranged in the classic way, as shown:


    (The initial board arrangement of some of the variations is different; see the individual help pages for those variations to see their initial setups.)

    You move counter-clockwise around the board, toward your inner table. Your opponent (from your perspective) moves clockwise around the board, toward his/her inner table. (This is always true, regardless of what color you're playing -- the board is arranged appropriately for the player viewing it.)

    The Bar is (on physical boards) literally a bar down the center of the board. This is where pieces go when they're hit (details below). When bearing off (moving your pieces off the board), they go to your home -- the holding area to the right of your inner table.

    The dice are shown in the middle of the board in the player's colors. When it's your turn, the dice your opponent last used (if any) are shown.

  • Moving Pieces
    You take your turn by rolling the dice (in single games or matches that don't use the doubling cube, Pocket-Monkey(tm) does this for you automatically), and then moving your pieces counter-clockwise toward your home by the number of points (spaces) shown on each die. You move each die separately, but you can move the same piece using both dice if you like. For instance, in the image above, you (White) have rolled a 4-2. You have three options: 1. Move a piece four spaces, then another piece two spaces; 2. Move one piece four spaces, then move it another two; or 3. Move one piece two spaces, then move it another four. There's a difference between options 2 and 3, because you'll rest the piece briefly on a different point if you move four points, then three than if you move three points, then four. This matters in relation to blocking and hitting (below).

    You move a piece by clicking it with the mouse -- that moves it the number of spaces shown on the highlighted die. If you want to move the other die first, click that die to highlight it, then click the piece you want to move. In matches, you frequently have to roll the dice yourself (because you may choose to offer a double instead -- that's covered in the match instructions below).

    You may only move your pieces to a point (space) on the board where your opponent doesn't have a "block," as described below. This includes the point you rest the piece on briefly if you move the same piece with both dice. When all of your pieces are in your inner table, you may bear them off the board as described later under "Bearing Off."

    Doubles: When you roll doubles (both dice are the same number), you get to move as though you had four dice showing that number instead of the usual two! So, for instance, if you roll a 5-5, you may make four moves of five. This could be moving a single piece twenty points, four pieces five points each, or any combination thereof.

  • Moves with Restricted Choices
    There are some situations you can find yourself in where your choice of move is restricted:
    • If you can use both dice on your play, you must use both of them, even if there's a different move you'd rather make which would only use one of the die (and leave you unable to use the other die, e.g., blocked). In Backgammon, you can't make the move that only uses one die and not the other; you must make the move using both dice, even if you don't want to.
    • More commonly, you find yourself unable to use either of your dice, e.g., blocked. The game will tell you when this happens with a message at the bottom of the game board. Just click Send; see "Passing" below.
    • You might be able to use only one of your die, and not the other. You must use that die, at which point the game will tell you you're blocked: Just click Send (see "Passing" below).
    • There's a fairly unusual situation where you can use either of your dice, but not both of them. In that situation, the rules of Backgammon require that you use the larger of the two dice -- e.g., you don't get a choice of which die to use.
    If you highlight one of your die and then click a piece that looks like it should be able to move and the game tells you there are no moves for that die from that position, it means that you're running into one of the situations above where your choices are restricted. (We're working on a specific message for this situation.)

  • Blocks, Blots, and Hitting
    A player has a block on a point when he/she has two or more pieces on that point. If a player has a block on a point, the other player can't put any piece on that point, even briefly (as when moving the same piece with both dice). The block only applies to landing on that point, not moving past it -- so for instance if your opponent has a block on a point, you can move past it provided you don't have to rest on it.

    A blot is a piece that's all alone on a point. Blots are vulnerable: If a player leaves a blot and the other player lands on that space, he/she hits the piece which sends it to the bar in the middle of the board. When you have pieces on the bar, you cannot move any other piece until you can move the piece from the bar back onto the board. (Re-entering the board is described below.) Sending a piece to the bar basically makes it start at the very beginning of the race -- it has to travel the full length of the board before getting home.

  • Entering the Board
    When you have one or more pieces on the bar, you cannot move any other piece until you move them back onto the board, a process called entering the board. Your pieces enter the board in your opponent's inner table.

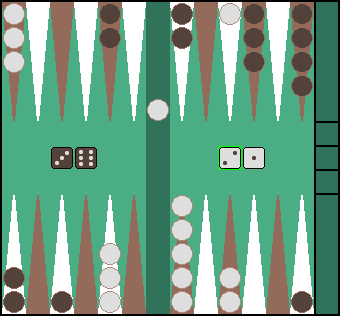
    For instance, assume you're White in this situation:


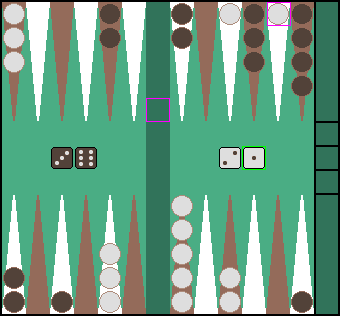
    You have a piece on the bar, and a 2-1 roll. You must re-enter that piece before you can move any other piece. To do so, you play the dice as though you were entering from just to the right of Black's inner table -- a 1 would put you on the first point, a 2 on the second point, and so on. You can choose which die you use to enter the board, but in the particular case shown, we see that Black has a block (four pieces) on the first point, so you cannot enter using the 1. Happily, though, there's no block on the second point, so you can use the 2 to enter the board:


    Because you no longer have a piece on the bar, you may then move any non-blocked piece using the remaining 1 die.

    In this case, it's a good thing (for you) that Black didn't have a block on the second point. If you had been blocked on both points, you would have had to pass your turn entirely! It's possible for a player to have a block on all six points in his/her inner table -- a most unpleasant situation if you happen to be the opponent, and they've got you on the bar!

  • Passing
    When you can't move any of your pieces with the die roll you have, you're completely blocked and must pass your turn (or part of it, if you can move one of the dice but not the other one). You cannot pass at any other time.

    Auto-Pass: It's possible that you'll end up having to pass your turn several times, if your opponent has you well blocked, because the dice might not come up for you. When you pass your turn, you have the option of telling Pocket-Monkey(tm) to keep automatically passing your turn until you can move again. This speeds up the games, by allowing your opponent to keep moving while you're blocked and have no choice but to pass. It has no effect on the outcome of the game (except in matches; this is discussed later), since all that Pocket-Monkey(tm) is doing is passing automatically when you would have had to pass anyway. If you do use auto-pass, it only applies to that particular situation -- it doesn't start passing automatically again the next time you're blocked. Finally, when it is your turn again, if you ended up passing more than one turn, Pocket-Monkey(tm) Backgammon shows how many turns you passed in the lower right-hand corner of the game display.

  • Bearing Off
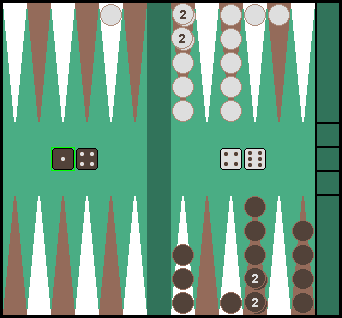
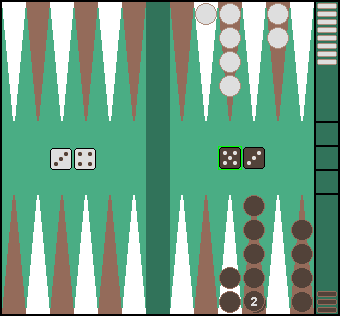
    Once you have all of your pieces in your inner table, you can bear off, which is to say you can move pieces off the board (home). Consider this situation:


    Here, Black (well, brown) can bear off but White cannot, because White doesn't yet have all of his/her pieces in the inner table.

    When bearing off, there are two possible ways you can move pieces off the board: In the usual case, you can remove pieces that are exactly the same number of points from home as the die value -- e.g., you can move a piece off the five point with a 5 die. The other situation happens if you have a die which is higher than your highest piece -- say, you only have pieces on your lowest three points, and you roll a 5. In that case, you can take off your highest piece with that die. Let's take a closer look at each situation: In the diagram above, we're in the usual situation: If Black had a 3 he/she could remove one of those pieces stacked up on his/her three point (here are seven of them -- note that the ones that are stacked two high are marked with the number 2). As it is, he/she has a 1-4 roll, so he/she can remove one of the pieces from the one point (there are four there) using the 1, and the only piece on the four point using the 4. (Or he/she could move within the table using the dice, instead of bearing off, but since the point of the game is move your pieces off the board, it's fairly rare to do that unless your opponent still has pieces in your inner table and you're defending against them.)

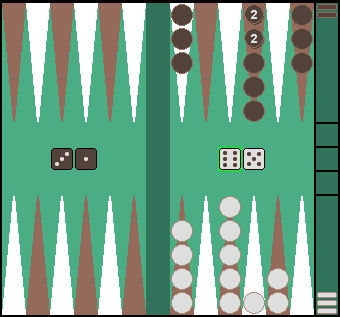
    The other situation, having a die higher than your highest piece, is shown below:


    Here you're playing Black, and you have a 5-3 roll. You don't have any pieces on the five point, but you don't have any pieces above it (e.g., on the six point), either. Because of that, you can bear off your highest piece (one of the two on the four point) using the 5.

    Sometimes, these rules mean you end up being forced to move within your inner table instead of bearing off a piece. Consider this situation:


    Here you're White and you have a 6-5. The good news is you can use the six to bear off one of the four pieces you have on the six point, but the bad news is that you can't bear off any piece with the 5, because you don't have any pieces on the five point. You must simply move within the board. Sometimes you get a choice of what move within the board you make, but in this case all you can do is move a piece from the six point to the one point.

  • Gammons and Backgammons
    If you remove all of your pieces before your opponent removes any of theirs, you win a gammon. If you remove all of your pieces before your opponent removes any of theirs and they still have a piece in your inner table, you win a backgammon.

    Gammons and Backgammons don't really matter, except perhaps for injured pride, in single games of Backgammon. But in match play, described below, it affects the scoring of the match.

Match Play

In match play, you're playing a series of games to an agreed ending score -- e.g., a match of five points, a match of nine points, a match of 21 points. You win a point by winning a game. There are also situations where you can earn more than one point for winning a game. This section describes match play.

  • Object
    In Backgammon Match, the goal is to keep winning games until your score reaches or exceeds the agreed match length. When one game ends, another is started until the match is over.

  • Doubling
    Pocket-Monkey(tm) has two kinds of match games: One that use the doubling cube, and ones that don't. The ones using the doubling cube are Backgammon Match 5, Backgammon Match 9, and Backgammon Match 21. The ones that don't are creatively named BG Match 5 - No Cube, BG Match 9 - No Cube, and BG Match 21 - No Cube.

    For the matches that use the doubling cube, it's shown between the two homes (in this diagram, it's circled in blue):


    At any point when it is your turn (except the first turn, or if you don't "have" the cube -- details below), you may offer a double -- e.g., offer to double the stakes of the game, meaning that the victor will get two points instead of one for winning. Your opponent may then either accept the double and play at the doubled stakes, or decline the double and lose that game. If you offer to double to two points, but your opponent declines, you win one point (not two) immediately and the next game is started. If you double to two points and your opponent accepts, play resumes at the new stakes.

    When a player declines a double, gammons and backgammons are not scored. For instance, if White offers Black a double when Black hasn't borne off any pieces yet and Black declines, it's just a normal victory for White, not a gammon. If White thought he/she were in a strong enough position to get a gammon, he/she would be more likely not to offer the double, because the gammon would be worth twice as much as a declined doubling offer. For this reason, you'll frequently see players in a very strong position double as soon as the other player gets just one piece off the board -- because no gammon is possible any longer, so they're not giving up the possibility of the extra points it would provide.

    It may be obvious, but one typically only doubles when one is in a fairly strong position and is at least moderately certain of winning the game. Otherwise, why would you want to double the stakes?

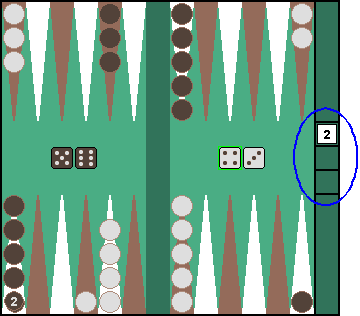
    When you double and your opponent accepts, he/she then has control of the doubling cube -- indeed, you'll see it move to his/her side of the board:


    Here, White has doubled and Black has accepted (although looking at the pieces, White didn't really have a good reason for doubling!), so the cube shows a '2' (as in "times two" -- the stakes are doubled) and Black now has control of the cube. At this point, only Black can offer a double; White cannot. This is to prevent the player in the stronger position from constantly doubling and redoubling.

    However, if Black did offer to redouble the stakes (to four points instead of two) and White accepted, the situation would be reversed -- White would have the cube. The last player to accept a double in a game is the player with control of the cube.

    Although it's hard to resist "soldiering on" when offered a double, there are times when you really should decline. One mark of an inexperienced player is not being able to decline a double when the situation really warrants it.

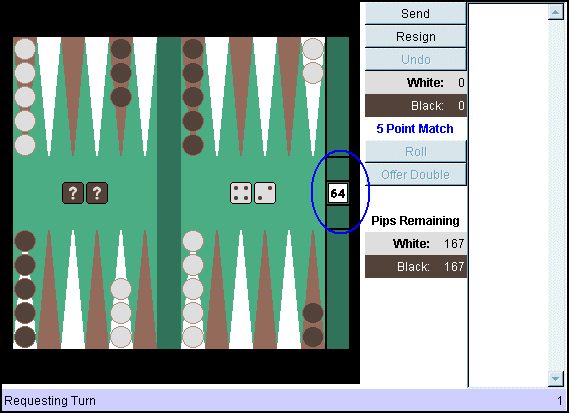
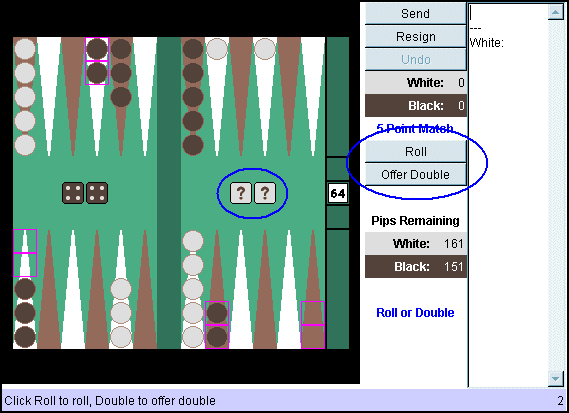
    Game Controls: When it becomes your turn and you need to decide whether to roll or offer a double, your dice will appear as a pair of question marks and the "Roll" and "Offer Double" buttons are shown:


    Here, White is deciding whether to roll or offer a double. To roll the dice, click the Roll button; to offer a double, click the Offer Double button (it will ask if you're sure). (You may also roll by clicking either of your '?' dice, or offer to double by clicking the doubling cube.)

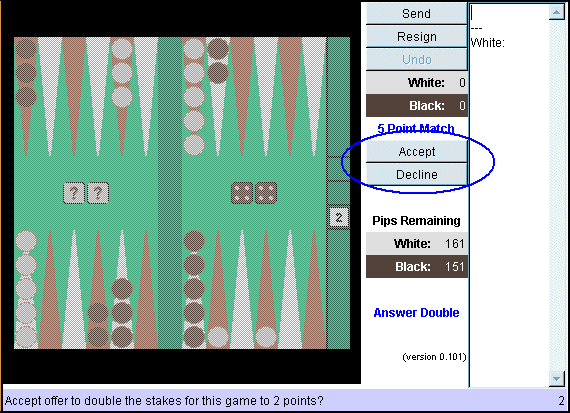
    When your opponent is offering you a double, you'll see the Accept and Decline buttons:


    Here, Black is responding to a doubling offer by White (and again, White isn't really in a doubling position). Black must accept the offer by clicking the Accept button, or decline it by clicking the Decline button. Declining a double means losing the game; your opponent gets the game's previous value.

    (This business of White offering doubles that don't look justified raises a useful point of etiquette: It's considered somewhat rude to offer doubles just for the sake of it, as White appears to be doing here. It implies you're not taking your opponent seriously.)

  • Auto-Pass and Doubling
    If you're completely blocked and you've told Pocket-Monkey(tm) to keep automatically passing your turn until you can move again, Pocket-Monkey(tm) will assume you want to roll on each turn rather than doubling. Normally this is fine, since if you're blocked, you're probably not in a good position to offer a double. However, there are scenarios where it's conceivable you may want to offer a double. Remember, too, that Pocket-Monkey(tm) doesn't know what the dice will be when it makes the decision for you to roll instead of offering to double -- this may be the roll that gets you free! So use Auto-Pass with caution when you might want to double.

    Of course, auto-pass never accepts a double or anything like that. If you're blocked and auto-passing and your opponent offers a double, the game comes back to you for the answer.

  • Match Scoring
    In matches, the score starts at zero and a player normally gets one point for winning a game. But if the player wins a gammon (see earlier), he/she wins two points. A backgammon is worth three points. This is true in all match games, including the "no cube" type.

    In the matches that use the doubling cube, the basic value above is multiplied by the value of the doubling cube. If the stakes have been doubled to two and player wins a normal victory, it's worth two points instead of one. Similarly, if the stakes are doubled and a player wins a gammon, he/she gets four points instead of just two (two points for the gammon, doubled). A backgammon (three points) doubled is worth six points (three points for the backgammon, doubled). And so on. This can get dramatic, for instance winning a backgammon when the stakes are at four (each player doubled once) is worth 12 points! (Three points for the gammon, times four because of doubling and redoubling.)

  • Resigning a Game
    In a match, if your situation is hopeless and your opponent is definitely going to win, you can choose to resign that game without resigning the match. You and your opponent will then continue with the next game.

    Warning: If you resign a game before you've borne any of your pieces off the board, you resign a gammon and your opponent gets the extra gammon points! If you resign while still in your opponent's inner table and you haven't borne any pieces off, you resign a backgammon and lose three times the game value! So be careful when resigning games. (This is not true when declining doubles, which is different from resigning the game even though you still lose the game.)

  • The Crawford Rule
    The Crawford rule only applies to matches that use the doubling cube.

    When the first player gets within one point of winning the match, the next game is called the "Crawford Round" and doubling is not allowed. This is the "Crawford Rule." It only applies the first time a player reaches the penultimate score.

    Consider a match where you are playing to five points and your opponent has just won a game, taking the score to 4-2 in his/her favor. In the next game, you have no reason not to immediately offer a double, since if you lose the game, you'll lose the match anyway, but if you win the game you want as many points as you can get.

    The Crawford Rule was invented by John R. Crawford circa 1970 for match play, and is very widely used in tournaments. It's intended to prevent the player in the weaker position from taking advantage of the fact that they have nothing to lose by doubling. However, it is only in effect for one game. If the player in the weaker position wins the Crawford Round, he/she has earned the right to double again (and presumably will, unless the scores are tied and doubling would have no effect).

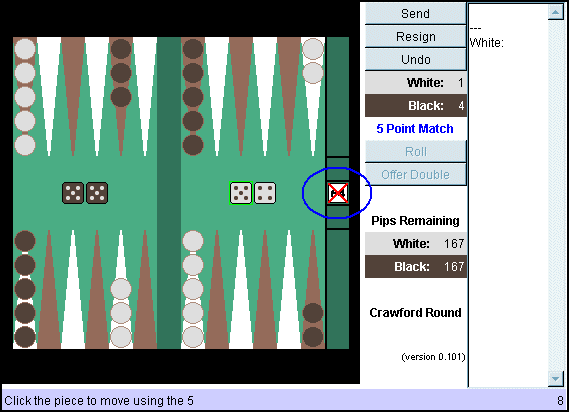
    When the Crawford Round is active, the doubling cube is shown with an X through it:


    Here, Black has just won a game taking him/her to 4 points, while White has just one point. It's a five-point match, so this game is the Crawford Round.

    Enjoy your games!